Monday, November 26, 2012

New CET 3.2 rendering technique

No longer need the "white room" to render!

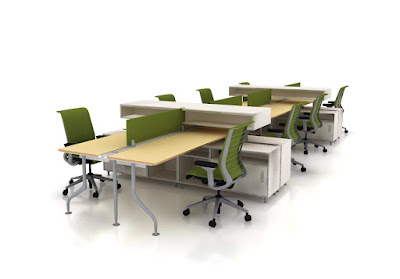
It's been a while since I posted and a lot has happened. I'll get to that later. But for now, my friends, the best new thing in CET 3.2 is a little check box called Emissive background.  What that means is there is a nice white ambient light that is shining all around our layout that we can use with the Natural Light render mode.  So, no more need for the white room to get a nice natural light effect.
Here is an example:


I've made a short video to get you started.


As always, I appreciate your feedback and comments. Enjoy!!

Cate


Tuesday, September 25, 2012

Ghost Panels

Rendering in CET Designer is a hot topic for me these days.  A lot of my time in training is spent on it and I've been showing some of my students this nifty way to create Ghost Panels.  It's very similar to the process you use for the SketchUp look but with a twist. 

Here is the result:


I created a short video with the steps if you'd like to watch it.


Hope this works for you.

Cate

Thursday, August 9, 2012

Announcing In-Depth, Topic Focused, Webinar Series

Get in-depth education in two 2-hour one topic training, specifically geared for your users.  The webinars are hands on; you sit comfortably at your own computer with CET running as I demonstrate, watch, and guide you as you learn. The first session ends with a homework assignment to reinforce the topics covered. 
Part of the second session is a Q&A discussion about best practices.

Cost:

Each course is $250 per person. Class is limited to 6 participants.

Dates:

CET Rendering:
  • September 17 & 18, 2012, 11:00 to 1:00 EST
  • September 19 & 20, 2012, 2:00 to 4:00 EST

CET ProjectSymbols In Depth:
  • September 19 & 20, 2012 11:00 to 1:00 EST

CET Edit Graphics and Specials:
  • September 17 & 18, 2012, 2:00 to 4:00 EST

Sign up now:

Sign up at www.catesword.com or email me at cate@catesword.com for more information. More classes will be added as needed, check the web site for more times and dates.

Course Outlines

CET Rendering Class

Session 1 Topics:
  • Basic rendering tips – angle, composition, depth
  • Capture Image
  • Lighting – simple, multiple sun, grid, ceiling tile
  • PhotoLab setting
  • Photo Series
  • Paperview
  • Output
Session 2 Topics
  • Environment
  • Materials
  • SketchUp
  • Special effects

CET ProjectSymbols in depth

Session 1 Topics:
  • Placement, rotation
  • Layers
  • Resolution
  • Block replace
  • Specification
Session 2 Topics
  • Standard options

  • Specials
  • Non supported Catalogs
  • Converting drawing

CET Edit Graphics and Specials

Session 1 Topics:
  • Replace Graphic
  • Simple modifications
  • Advanced modifications
Session 2 Topics:
  • Review Advance modifications

Thursday, July 19, 2012

A CET Dimension Tip

Wow, where has the time gone! So much for giving you tips every month!  I'll try harder, but for now I have another tip for the CET Designer users.


For many of you as you start using the software for installation drawings you find that you don't have the control over the dimensioning you'd like.  Sure, now we can set a preset size and change them all globally but we are still missing the true ability to link them to specific "layers" or as they are called in CET Visibility Categories. I know it is coming but until CET has it solved I have a work around.


I had a client ask me the other day if she could have dimensions for a panel plan and then other dimensions for components.  The answer is not really.  But I found a way she could do it.  I'll share it with you.

  • First you rename one of the Part Tagging Tags to Panel Dimensions and the other to Component Dimensions (you don't really HAVE to do this but it gets confusing if you don't).


  • Then right click on the dimension and pick Visibility and Categorization.


  • In the Categorization tab check either Panel Dimensions or Component Dimensions.


  • When you set up your PaperView Viewports just make sure that you don't have Normal View selected and then go to the Part Tagging and check the dimensions you want to print.

There you go.  I suspect there are more uses for this tip, let me know if you find other ways to use it.

Also, don't forget to order your renewal before August 1.  If you plan on renewing in the future do it now before the rates go up!!

Enjoy the rest of the summer!

Cate

Tuesday, April 17, 2012

CET Materials

I am always looking for resources for great materials to use in rendering.  Configura has a nice zip file on their web site that you can download. It's on the documentation page. But there isn't quite enough choices.

Another resource I found was on my own hard drive! AutoCAD installed a huge library of wonderful materials.  I found it in the C:\Program Files (x86)\Common Files\Autodesk Shared\Materials2011\assetlibrary_base.fbm\2\Mats directory.  Some of the files are Bump files which give AutoCAD the texture information, others are Mask files that AutoCAD uses for creating holes in the material (think of chain link fence).  You probably won't use those type of files. However, if you look through the directory you will find some nice stone and brick patterns.

Here is a screen capture of the directory:

Hope you are able to use these materials.

Cheers!
Cate

Wednesday, March 7, 2012

New Configura CET Tip

Hello friends,
I haven't had much to share lately but today I want to tell you about a CET trick I discovered when I was testing.


Updating multiple alternatives at the same time
Lots of people ask me if they can make changes to all their alternative at once and I have always said no.  But I found a work around using Blocks.

See, a block is the same in all your alternatives, so if you make a block of your architecture you can update it in one and all the other alternative will also update.

Here are the steps:
  1. Draw your room in one of your alternatives.
  2. Select the whole room and right click to pick Make Block.
  3. Leave the Block dialog open and switch to another Alternative.
  4. Place the Block.

When you change the Block in any alternative they all will change.


You can do this with other things that are the same in all the alternatives as well, like accessories or even the workstations.

Hope this is something you can use!

Have a great day,
Cate